Wednesday 30 September 2009

Fun in Photoshop


This image was shot on the marble bridge over to the Oslo Opera, just after sunset.

Sunday 27 September 2009

Turn windows into reflective mirrors


It can be done with any large window if the light is right. Place your camera sideways, as close as you can to a glass window and you will see it turn into a mirror.


Tuesday 22 September 2009

Picture of the Week in Oslo Kamera Klubb


I received the book William Eggleston's Guide by John Szarkowski as the prize - looking forward to digging into it!


Saturday 19 September 2009

Gold-N-Blue Polarizer

A circular polariser is a must for landscape photography. I just read about the "Gold-N-Blue Polarizer" and I guess I have to do some landscapes again soon. :-)  Read the Sing-Ray blog about this filter.

Singh-Ray Blog

Friday 18 September 2009

It's all about balancing the light

The buddha is placed inside the window of a shop, and the building is behind me but reflected in the window.

With reflections it is all about balancing the light between two or more planes in the image. I had been waiting for the sun to light up the building in the background - so that I could get both buddha and building in the same shot but it turned out that the building became so bright that the buddha disappeared.

The light for this shot fell in place when the sun was shining on the same wall as the buddha. The sun was a bit low so the windows on the "buddha side" reflected the sunlight onto the opposite building. This "halfway" light turned out to be the best match with Mr. Buddha.

The inspiration for this picture was the Buddha Project at Lensculture. So if you have a local Buddha of your own I dare you to submit it. :-)
Choosing a different angle creates a completely different image:


Thursday 17 September 2009

Skateboarders at Dyvekes Bru in Oslo

I love going to this skateboard park that I have discovered on one of the weekly walks with OSLO KAMERA KLUBB.

Wednesday 16 September 2009

Norwegian Photographic Society - Autumn Competition


I am looking forward to this competition, announced today. This is a competition between the Norwegian camera clubs. A great way to get feedback on your work and hey - they might put your image on the poster for next year's competition :-) The deadline is october 15th, or 5th for Oslo Kamera Klubb.

Tuesday 15 September 2009

Get your flash off the camera

I recently read that the best gift to give to your flash was an off-camera shoe cord. This is Canons version. You can get it at Warehouse express for £50.
For this picture I held the flash under the camera.

Sunday 13 September 2009

Shadows and Highlights in Photoshop

The camera is not capable of seeing the same range of light as the eye. For that reason you get shots where the bright is too bright, and the dark is too dark. This picture can serve as an example.

I wanted to capture the details of the granite floor where the light from the big windows lights it. I also wanted details enough in the shades to separate the shadows of the two men from the dark floor.

The solution is the tool "Shadows / Hightlighs" i Photoshop. It resores details both in the shadows and in the highlights. Here is a video tutorial from YouTube.

Saturday 12 September 2009

Split Toning in Photoshop

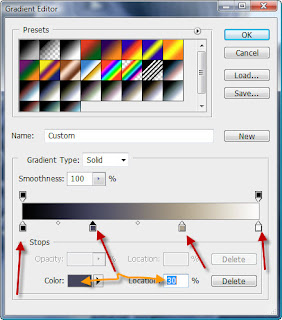
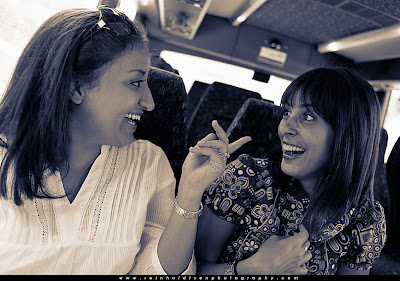
As an alternative to pure black and white you can use Split Toning in Photoshop. In this example you can see that the black has a blue tint, and the white has beige tint. Split toning with two colours is also called Duotone.

First convert your image to black and white. This is not a prerequisite.
Then add an Adjustment Layer called Gradient Map. Click in the field marked with a green arrow and your Gradient Editor opens.

In the Gradient Editor, set the four points marked with red arrows.
The leftmost point already exists, but must be set to black (#000000).
The second point you have to create and set to 30% (shown). Click in the blue field to select your colour (#45475d).
The third point you create and place at 68%, then select your beige (#afa18d).
The rightmost point already exists, but must be set to white (#fcfcfc).

Press OK and your split toning is applied.

Thursday 10 September 2009

Wall of gold


If you have been on the roof of the opera house you will have noticed that the colour of the wall is closer to silver than gold.

Two elemens contribute to the golden colour.

The first is that these images are taken at sunset. The low sun coming in from the side is of course also the source of the shadows.

The other tip is to set your white balance to Cloudy, that warmes up the tones of your image even more.

Tuesday 8 September 2009

Motion Blur


Sports pictures are often taken with a fast shutter speed of, say, 1/1000 seconds to freeze the action. This is what will happen if you use the Sports Mode on your camera.

An alternative is to use a slow shutter speed and to follow the moving person or object with the camera. This is calle panning.

Set your camera to Shutter Priority (Tv) and 1/30 second. Choose a single focus point and place it on the head of the subject. Also select a muliple shots setting, and AI Servo so that the camera will refocus for each shot.

Place your feet in the same direction as the object is headed, turn back towards the subject. Pin your elbows to your body and fire away. Concentrate on fixating the focus point on the persons head while you turn.

Cyclists are easier objects for practicing than for example a jogger, as the cyclist only have movement in one direction.
If it is difficult for the camera to refocus you could alternatively choose a point where you know your object will pass, and then switch to manual mode.

Monday 7 September 2009

Travel Photography Tips

Today there is an interview with David duChemin about travel photography and how to shoot people when travelling. The video is not embedded so click on the link below the picture to see the video. If you are in a hurry, start the video at 1:53 minutes to get his three tips.


Photoshop User TV Episode 202.

If you liked the book you can see one more interview (in 5 parts) with the author here:


David duChemin, Part 1 from Mad Pants Productions on Vimeo.

Sunday 6 September 2009

Sunset at Akershus Fortress

This type of shot you achieve by exposing for the sky. Underexpose by 1-2 stops and check your histogram. Use only one focus point and it must be set on the people to get a sharp silhouette. A low camera angle is important - here I was on my knees in the mud.

Saturday 5 September 2009

The streets of Oslo

Another reflection shot with the dolls inside the shop and a woman passing by behind me. For this to work there has to be an even amount of light on the dolls and the person passing by.

Thursday 3 September 2009

"Jump!" discussed in podcast


My favourite photography author is creating a series of 20 podcasts. In episode 14 he discusses my picture "Jump!".
The picture is taken on the roof of the new operahouse in Oslo. The sun comes in from the side, which is why the two shadows to the left are almost mirror images of the two jumpers.
I underexposed to get the silhouettes and to make sure the wall was not "burnt out".